 Save
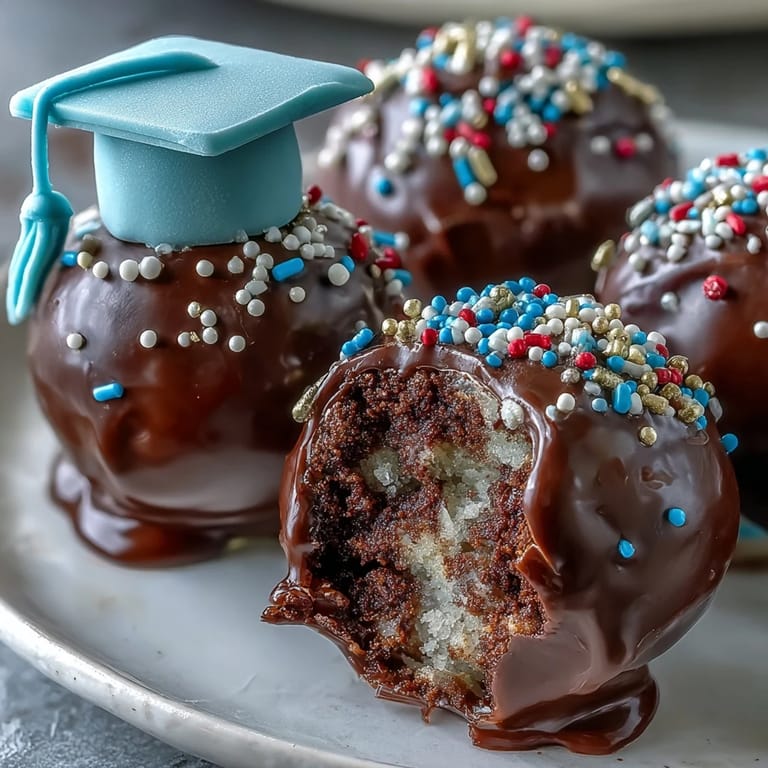
Save The first time I ever attempted cake pops, I was dusted head to toe in colored sugar and chocolate splatters—the kitchen felt more like an art studio than a bakery. For graduation season, these cake pops became a vibrant centerpiece, celebrated not just for their flavor but their playful nod to school pride. Mixing crumbs with frosting while humming along to a playlist made the process both meditative and, somehow, thrilling. As I finished the very first batch, the sweet scent of warm cake mingled with candy melt, making the kitchen feel festive even before the decorations went on. It's funny how celebration food like this often ends up being the most fun to make, especially with friends pitching in to choose colors and sprinkle designs.
Last year, my little cousin threw his mortarboard sky-high, then dashed straight for the dessert table, proudly pointing out the cake pops decorated in his exact school colors. Watching guests giggle over matching sprinkles and edible glitter, I realized these tiny pops had turned into conversation starters. The moment sticks out—I even caught Grandma trying to sneak the blue-and-gold ones for her purse.
Ingredients
- Cake: Whether you use a box mix or homemade, a fully cooled cake creates the ideal crumbs for smooth, moist cake pops. I always let it rest a bit longer to prevent sticky clumps.
- Frosting: Cream cheese or buttercream works; I learned that starting with less and adding gently keeps the mixture from becoming too loose.
- Candy Melts (in school colors): These give the coating its vibrant effect. If you want custom colors, mix white melts with food coloring—never overheat or they'll seize.
- Vegetable Shortening: Sometimes candy melts run thick; a spoonful of shortening smooths things out for an even gloss.
- Sprinkles, Edible Glitter, Colored Sugar: Choose shades that match your school's palette. I like to plot out the sprinkle plan before dipping.
- Lollipop Sticks: Essential for holding and displaying—make sure they're dry and sturdy.
- Mini Chocolate Chips: These make charming tassel accents or decorative dots—press them gently so they stay in place.
- Fondant: Optional, but helpful for cap decorations. Roll or cut squares beforehand for minimal fuss.
Tired of Takeout? 🥡
Get 10 meals you can make faster than delivery arrives. Seriously.
One email. No spam. Unsubscribe anytime.
Instructions
- Bake the Cake:
- Follow the box or homemade recipe, then let the cake cool completely on a wire rack. It's tempting to rush, but cooling stops the crumbs from turning gummy.
- Crumble the Cake:
- Break the cake into fine crumbs using your hands or a fork; the sound and feel of soft cake is oddly satisfying.
- Add Frosting:
- Mix in frosting a spoonful at a time. Combine until the dough feels sticky but still firm, so the balls hold their shape.
- Shape the Pops:
- Grab tablespoon-sized scoops and roll into smooth balls. Lay them out evenly on the baking sheet and chill to set.
- Chill the Balls:
- Refrigerate for at least an hour or quick-freeze for 20 minutes; proper chilling prevents balls from slumping during dipping.
- Melt the Candy Coating:
- Microwave melts in short bursts, stirring after each round. Add shortening if needed for silkiness—the aroma is sweet and inviting.
- Prepare Sticks:
- Dip each stick tip in coating, then push gently halfway into each chilled ball; this anchors the sticks and keeps pops steady.
- Dip Cake Pops:
- Submerge each pop in melted coating, twisting for full coverage. Tap lightly to remove excess and achieve a glossy finish.
- Decorate:
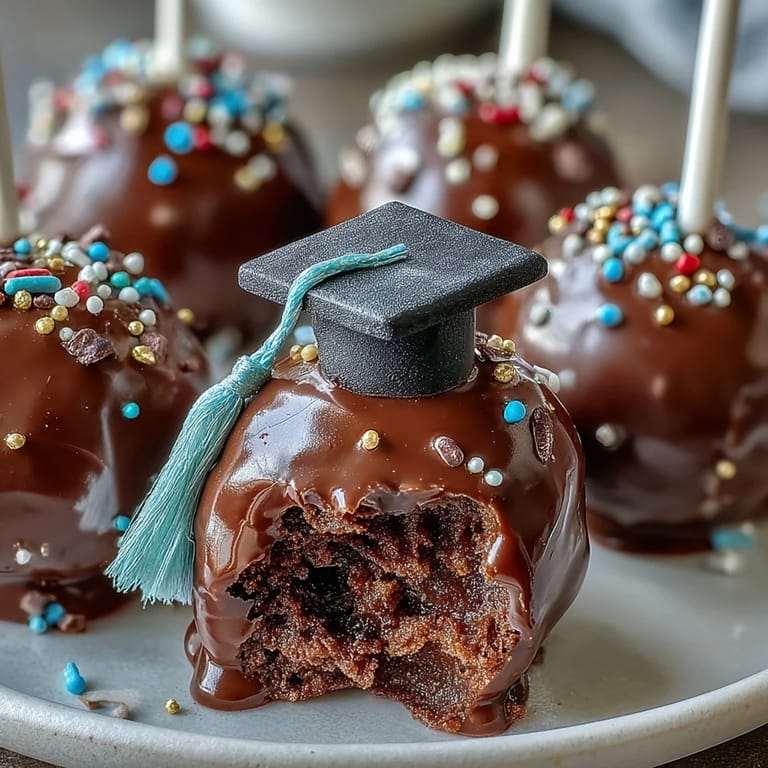
- While the coating is wet, sprinkle with colored sugar, glitter, and add fondant squares or chocolate chips for cap and tassel details.
- Set Pops Upright:
- Place pops in a styrofoam block or stand. Let them set until hard, resisting the urge to touch until fully dry for best results.
 Pin it
 When the pops were finished and neatly lined up, a friend snapped a photo that ended up in every graduation recap. Seeing these treats become part of shared memories felt bigger than any recipe success. The pops weren't just dessert—they were badges of accomplishment and markers of celebration.
Choosing School Colors for Decorations
Picking the right shades is half the fun—I usually lay out options and test a few candy melt combinations before committing. Sometimes team colors clash, but a little edible glitter brings everything together for a truly festive look. A trick I discovered: pairing dark chocolate chips with bright fondant always makes those 'graduation cap' pops stand out.
Storing and Serving Cake Pops
If you're prepping ahead for a crowd, store cake pops in an airtight container at room temperature or refrigerate them for up to a week. I found they travel well packed upright in cupcake carriers—no accidental smudging. Letting them reach room temp before serving brings out the cake's softness and flavor.
Troubleshooting & Last-Minute Fixes
Sometimes candy melts refuse to behave—if the coating is lumpy, a quick stir and a splash of shortening will smooth it out. If pops fall off the sticks, let them chill longer or try thicker cake balls. A broken fondant cap can easily be patched with a bit of melted chocolate.
- If you run short on sprinkles, colored sugar or edible markers fill the gap.
- When pops start to crack, roll them more gently and keep chilled until dipping.
- Patience pays—wait for the coating to dry completely before moving or packaging.
 Pin it
 Making graduation cake pops with friends always brings laughter and plenty of color to the kitchen. No matter how wild the decorations, these pops always steal the show at any celebration.
Frequently Asked Questions
- → How do I match school colors in cake pops?
Use colored candy melts or white chocolate with food coloring to achieve custom school colors. Decorate with matching sprinkles or fondant.
- → Can I use a homemade cake instead of cake mix?
Yes, a fully cooled homemade 9-inch cake works well for crumbs. Ensure it is moist for best binding.
- → How do you make graduation cap decorations?
Shape fondant into squares for caps and attach a mini chocolate chip as the tassel, securing with melted chocolate.
- → Is it possible to make gluten-free cake pops?
Use gluten-free cake mix and check labels for all ingredients, especially frosting and decorations.
- → How should you store cake pops after making?
Store pops in an airtight container at room temperature for up to 3 days or refrigerate for a week for longer freshness.
- → What are the nutritional values per serving?
Each serving contains about 160 calories, 7 g fat, 23 g carbohydrates, and 2 g protein.