 Save
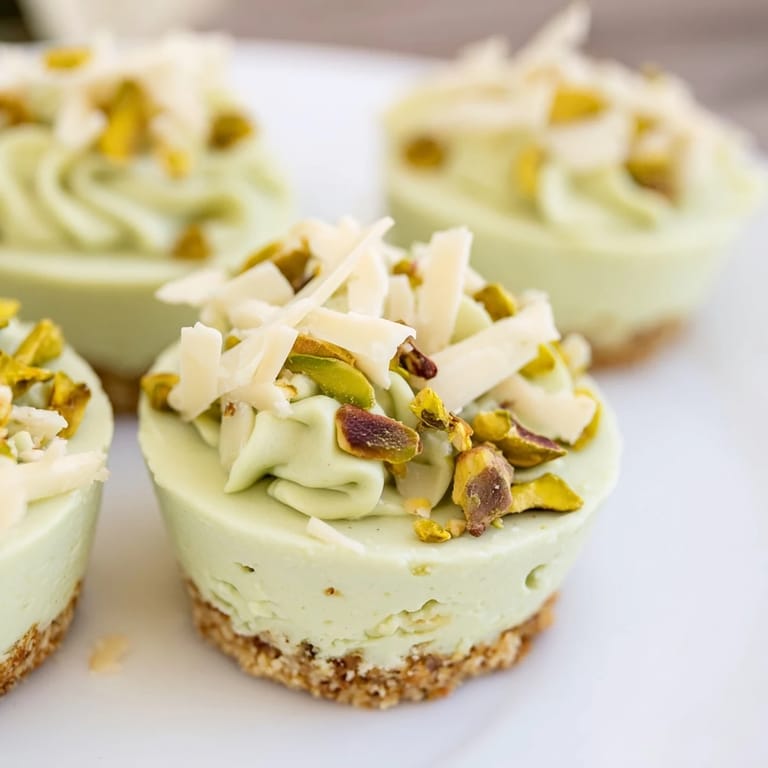
Save There's a moment that sticks with me: standing in a specialty food shop, I caught the scent of roasted pistachios and knew I had to create something around it. These pistachio cheesecake bites came together one quiet afternoon when I wanted to impress someone with something that tasted sophisticated but required almost no oven time. The first bite released that buttery, nutty flavor I'd been chasing, and I realized I'd stumbled onto something genuinely special.
I made a batch for a dinner party where my friend Sarah mentioned she'd never had anything with pistachio filling before. Watching her take that first bite and pause—really pause—to savor it was worth every minute of prep. She asked for the recipe before dessert was even finished, and now these bites show up at her gatherings too.
Ingredients
- Shelled unsalted pistachios (1 cup/120 g): The heart of this recipe, so buy the best quality you can find—they make all the difference between good and unforgettable.
- Graham cracker crumbs (1/2 cup/60 g): These bind everything together and add subtle sweetness; don't skip them thinking whole pistachios are enough.
- Unsalted butter, melted (3 tbsp/40 g): The glue that holds the crust together without making it greasy.
- Granulated sugar (2 tbsp/25 g): Just enough to complement the nutty flavors without overwhelming them.
- Salt (pinch): A tiny amount that mysteriously makes pistachios taste more like themselves.
- Cream cheese, softened (8 oz/225 g): Room temperature is non-negotiable here—cold cream cheese will create lumps that no amount of beating fixes.
- Powdered sugar (1/3 cup/40 g): Dissolves cleanly into the filling without grittiness.
- Heavy cream (1/4 cup/60 ml): Whipped to soft peaks, this transforms the filling from dense to cloud-like.
- Pistachio paste or pistachio butter (1/3 cup/80 g): The second voice of pistachio flavor—use the smooth kind unless you want a textured bite.
- Vanilla extract (1 tsp): A quiet background note that deepens everything.
- Lemon zest (1/2): Optional, but it brightens the filling with a whisper of citrus that nobody can quite identify.
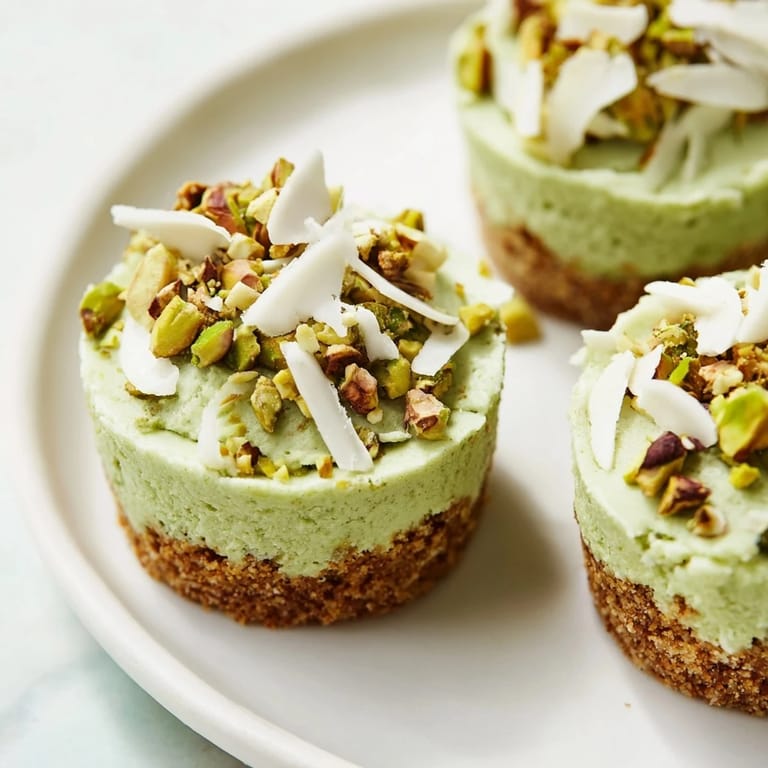
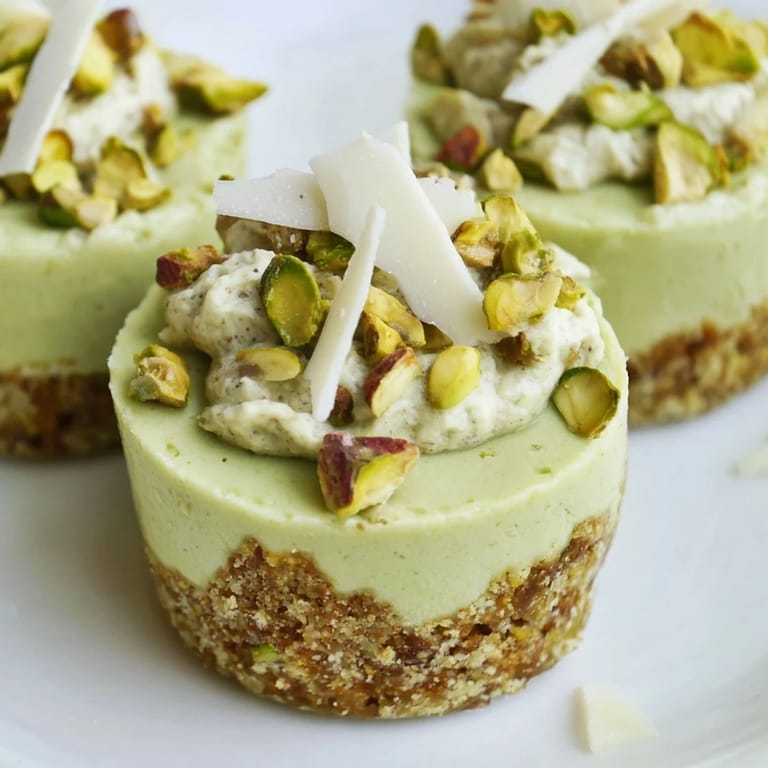
- Chopped pistachios for garnish (2 tbsp): These remind people what they're eating and add that final crunch.
Tired of Takeout? 🥡
Get 10 meals you can make faster than delivery arrives. Seriously.
One email. No spam. Unsubscribe anytime.
Instructions
- Set up your stage:
- Line a 12-cup mini muffin tin with paper liners or use a silicone mold if you have one—silicone makes removal so much easier that it's worth digging out if it exists anywhere in your kitchen.
- Build the crust:
- Pulse your pistachios in a food processor until they're finely ground but not yet a paste; this texture matters because it creates that satisfying crunch. Add graham cracker crumbs, sugar, and salt, pulse to combine, then drizzle in the melted butter and pulse again until it looks like wet sand—you want it to hold together when pressed but still feel textured.
- Press and pack:
- Divide the crust mixture evenly among your cups with about 1 heaping tablespoon per cup, then press firmly using a spoon or the flat bottom of a small glass. Push from the center outward so you get an even, compact layer that won't crumble when you bite into it.
- Create the filling base:
- Beat your softened cream cheese until completely smooth, then add powdered sugar and pistachio paste and beat until there are no lumps or streaks. This is the moment when patience pays off—a rough filling won't fold smoothly with the whipped cream.
- Whip and fold:
- In a separate bowl, whip heavy cream to soft peaks (peaks that fold over when you lift the whisk), then gently fold this into the cream cheese mixture along with lemon zest if you're using it. Fold slowly and deliberately—you're trying to keep all that air you just whipped in.
- Fill and chill:
- Spoon or pipe the filling onto your prepared crusts, smooth the tops, and slide the tin into the refrigerator for at least 3 hours. The waiting is the hardest part, but it's when the filling sets into that signature creamy texture.
- Finish and serve:
- Carefully remove the bites from the tin, garnish with chopped pistachios and any other toppings you've chosen, and serve straight from the fridge. They'll stay perfect for a few days if you keep them covered.
 Pin it
 What started as an afternoon experiment became the dessert I make when I want to feel like I've given someone something truly thoughtful. These bites carry a kind of quiet elegance that makes people slow down and actually taste them instead of rushing through dessert. That matters more to me than any fancy plating ever could.
Why These Bites Work So Well
The magic lives in the contrast—the moment your teeth crack through that pistachio crust and sink into the cloud of filling is when you understand why this recipe exists. The pistachio flavor doesn't compete with itself; both the crust and filling work as different expressions of the same nut, with the crust providing anchor and texture while the filling delivers pure, creamy luxury. It's elegant enough for a dinner party but simple enough to make on a regular Tuesday when you just want something good in your life.
Making Pistachio Paste at Home
If you can't find pistachio paste or want to save money, making your own is genuinely easier than you might think. Shell and dry-roast your pistachios for about five minutes in a 350°F oven until fragrant, then let them cool completely before pulsing them in a food processor for about ten minutes, scraping down the sides occasionally. At some point between five and ten minutes, the nuts will transform from crumbs to a chunky paste to finally a smooth, pourable butter—that last stage is when you stop. It won't be quite as smooth as store-bought, but it'll taste fresher and you'll feel proud every time you spoon it into the filling.
Storage and Make-Ahead Ideas
These bites actually improve after a day in the refrigerator because the flavors settle and deepen, which means you can make them the day before if you're cooking for a crowd. They'll keep for three days covered in an airtight container, and honestly, they're a gift to your future self when you're craving something elegant but don't have time to cook. You can also freeze the assembled, unchilled bites for up to two weeks, then thaw them in the refrigerator before serving—just don't freeze them after chilling because the texture changes in ways you won't like.
- Make the crust base up to two days ahead and store it in an airtight container before pressing into the tins.
- The filling can be made earlier in the day and kept covered in the refrigerator, then piped into the crusts whenever you're ready.
- Garnish with pistachios and any other toppings just before serving so everything stays fresh and nothing softens.
 Pin it
 These pistachio cheesecake bites have become my go-to when I want to create a moment without the stress. They taste like you worked for hours, but you'll know the truth as you clean up in fifteen minutes.
Frequently Asked Questions
- → How do I make the pistachio crust?
Pulse shelled pistachios with graham cracker crumbs, sugar, and salt until finely ground. Mix in melted butter until the mixture feels like wet sand, then press into muffin tins.
- → Can I prepare these bites ahead of time?
Yes, prepare the bites and chill them for at least 3 hours. They can be stored refrigerated in an airtight container for up to 3 days.
- → What can I use instead of pistachio paste?
You can make pistachio paste at home by blending shelled pistachios until smooth or substitute with smooth pistachio butter.
- → Are these suitable for vegetarians?
Yes, these bites are vegetarian-friendly as they contain dairy but no animal-derived gelatin or meat products.
- → How do I serve the bites for best presentation?
Remove the bites carefully from the muffin tin and garnish with chopped pistachios, white chocolate shavings, or dried rose petals for an elegant look.
- → Can I make these gluten-free?
Simply substitute the graham cracker crumbs with gluten-free alternatives to keep the crust gluten-free.